MenuMenu
- Compare. Save. Ship.
- Main Menu
- How It Works?
- Shipping Services
- eCommerce
- Learn

Your package’s shipping cost is determined by its weight, size, and the distance it has to travel to reach its destination. And unless all the products you ship have the same weight, you have to be able to adjust the shipping fees according to their weight.
This process might seem complicated, but it’s actually easy to do if you know how to set up your WooCommerce Shipping Classes. The process is even easier if you connect your Ship Expert account to WooCommerce and integrate the small business shipping process into your customers’ shopping experience.
WooCommerce Shipping Classes enable you to charge different shipping rates based on the products purchased. This way, if you sell a variety of light and heavy products, you can automatically adjust their shipping rate during the checkout process to cover the delivery costs.
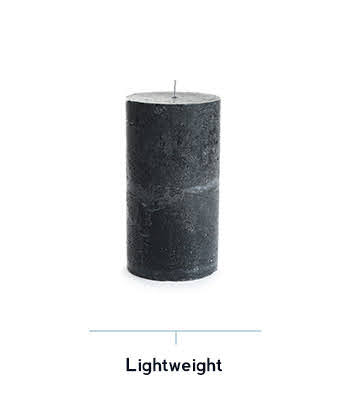
For example, let’s say that you manage a furniture store. Now, like most furniture stores, you probably sell everything from couches (bulky and heavy) to solid wood nightstands (heavy) and decorative candles (small and lightweight).


Now, if all your solid wood nightstands have a similar size and weight, you can group them under a WooCommerce Shipping Class and attribute a certain shipping price to that class. Same goes for your decorative candles - you can group them into another WooCommerce Shipping Class and set a certain shipping rate.
But that would probably not work for your couches. Their sizes and weights probably vary too much to be grouped into a single WooCommerce Shipping Class. However, you don’t have to worry too much about that because you can easily calculate the WooCommerce shipping for every item, and we’re going to explain how.
Now, without further ado, let’s see how you can set up WooCommerce Shipping Classes.

You can use WooCommerce Shipping Classes to group similar products and set a certain shipping price for all of them.
To do that, you need to go to WooCommerce > Settings and access the Shipping tab at the top of the panel. Once you do that, you should click on the Shipping classes link that appears underneath.
You should then enter a name and a slug for your shipping class. It’s often useful to add a description to each class because that could make it easier for you and your teammates to know what products go in which class. This is especially useful if you create multiple shipping classes.
Using our previous example, you could group your nightstands under a Heavy class and your candles under Lightweight.
You can then repeat this process for every shipping class you create to better manage your inventory.
Once you’re done, it’s time to include some products into your newly created shipping classes.

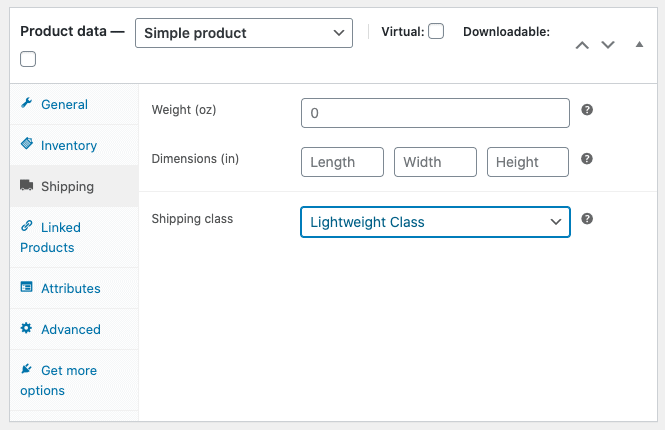
To assign a product to a shipping class, you need to go to Products and then click on the hyperlink of one of your products. Go to Shipping > Shipping Class and select the appropriate class for that item using the dropdown menu.
Repeat the process for all of the products you want to include in shipping classes. You can tick multiple products that are similar in size and weight and include all of them in a shipping class at the same time. To do this, you should check the boxes in front of the products’ hyperlinks, then go to the menu located in the top left of the panel and select Edit. Edit the shipping class value and save your progress.
Now it’s time to set up your shipping costs. But to do that, you’ll need to determine how much it would cost to ship every product. We’re going to walk you through this process, so you can skip the next two steps if you already know your shipping rates.
Find out how much each product weighs once it’s packed. Make sure to use all the packing materials you would use when sending the package to one of your clients.
Besides weight and size distance is the other major factor that influences your shipping costs. The farther a package travels, the more it will cost to ship it.
To account for this, you should get an estimate of how much it would cost to send each package to different zones in the country and factor in that cost.
It’s crucial to use WooCommerce Shipping Zones if you want to set accurate shipping fees. All major carriers in Canada charge different shipping rates based on the distance your package needs to travel to arrive at its destination.
The distances between different locations can be grouped into Shipping Zones. Setting up your Shipping Zones in WooCommerce enables you to pass along the right shipping rate to your customer during the checkout process.
You can use the table you created in the previous step to add your shipping rates for each Class and Zone.
To do this, go to WooCommerce > Settings > Shipping > Shipping Zones. Select the hyperlinked Zone Name and click Edit.
Now it’s time to add the appropriate shipping rate for each Shipping Class and Zone. Do this for all your Shipping Zones and save your progress.
You can skip steps 3 - 6 if you don’t want to complicate things by calculating your shipping fees based on travel distance.
You can simply use a flat free and make the process much, much easier.

To do this, go to WooCommerce > Settings and select the Shipping tab. Edit the Shipping Zone by hovering over it and clicking the Edit link. You should use a single zone for this purpose - name it Zone 1 or Canada or whatever you like.
Now, you’ll see that you’ll have to select one of the Shipping methods you set up. For this step, we’re going to use a single method - Flat rate. You can add your method by clicking on the Add shipping method button in the box on your right. Hover over it and press Edit.

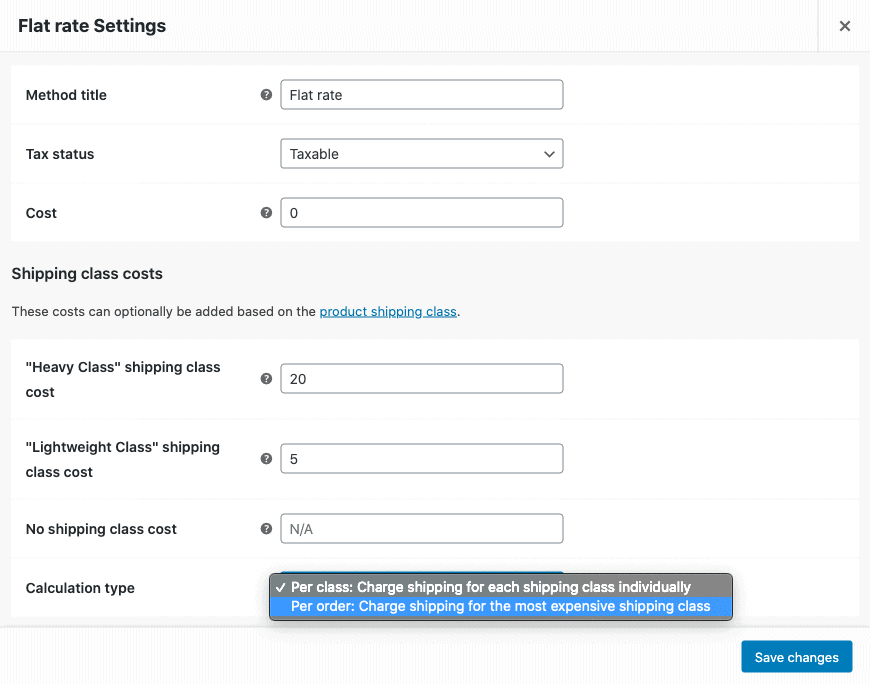
This is where you can edit the shipping fees for your different Shipping Classes. Using our previous example, let’s say that you edit your Heavy Shipping Class. Choose a flat rate that would cover your shipping expenses, no matter where you ship a product belonging to this Class, say $20.
You can repeat the process for all your Classes. Using our previous example, let’s say that you decide on a standard fee of $5 to ship decorative candles. So if a customer orders a nightstand and a candle, their total shipping cost would be $25.
Keep in mind that the Default shipping cost is set to 0. If you change your default shipping cost, its value will also be added to the final shipping class costs your customers will see on the checkout page.


Now, some of your customers might be displeased to see that you charge a separate shipping fee for each product they order. Sure, every product is different, but they might wonder why they should day three separate shipping fees when all the items would be part of the same order.
Well, you can solve this problem by charging a single shipping fee per order. You can do this by going to WooCommerce > Settings and selecting the Shipping tab. Then, go to Shipping Methods > Flat rate Settings and find the Calculation type button on to the bottom of the panel. Select the Per order setting and save your changes.
Once you do that, your customers will be charged a single shipping fee per order, based on the most expensive class only.
Using our previous example, if a customer would order a nightstand and a candle, they would have to pay a $25 ($20 for the Heavy item and $5 for the Lightweight one) shipping fee if you use the Per class setting and only a $20 fee if you use the Per order setting because the Heavy class has a flat shipping fee of $20 and it’s the most expensive class in the customer’s order.
When you sync your online store with Ship Expert’s WooCommerce shipping plugin, your software will automatically create shipping labels that cover the same price you’re charging your customers.
Our plugin automatically imports your WooCommerce order into your Ship Expert dashboard. You can then select each order and create a label for it. You can do this by selecting each order at a time or by selecting multiple orders in a batch.
Every time you create a label with Ship Expert, our software will automatically update the fulfillment status in your online store. And when you change the order status in WooCommerce, the change will also sync in Ship Expert.
And the best thing is, integrating Ship Expert into your WooCommerce store is easy.
Setting up your WooCommerce Shipping Classes might sound difficult, but this guide should help you do it in a short amount of time. Setting up your Shipping Classes is really simple if you decide on using flat rates for orders or shipping classes.
And if you don’t want to waste your time finding out how much your products weigh or how much it would cost to ship a package to one place or another, you can always let us handle it for you.
Ship Expert offers fulfillment services that are tailored to your business. Our warehouse management software can be integrated with all the major eCommerce platforms, enabling you to sell on different channels.
Our integrated software syncs with your inventory in real-time, so you’ll always be in control of your business. We ship out every order according to your exact specifications, so that your customers are always satisfied.
Learn more about our warehousing and fulfillment services
Ship Everywhere With Ship Expert

Director, Ship Expert
Greg Woo is a seasoned expert in the logistics and distribution industry, with a career spanning over two decades. He has a comprehensive understanding of shipping and distribution needs, and has extensive experience integrating with e-commerce stores as well as customer specific WMS (warehouse management systems) and ERP’s (enterprise resource planning software). His tenure in the industry and established courier and LTL partnerships have allowed clients to benefit from reduced shipping expenses, as well as improved operations through software and specialized integrations.
Greg is currently the Director at Ship Expert Inc., a role he has held since February 2015. Prior to his role at Ship Expert, Greg held significant positions at Juxto, a telecommunications and managed internet service provider.